Spannerhead Dot ComSpannerhead.com

Posts filed under ‘Technical’

Interesting Engines:
The Pratt & Whitney R-4360

August 20, 2012 by Matt

Pratt & Whitney R-4360 Wasp Major on stand

I’ll admit it. I’m an engine junkie. Despite not being an engineer by degree or trade, I’m fascinated by the myriad methods pioneers have devised to produce motive power for vehicles. So then, this post will kick off a new series aimed at discussing engines I find particularly interesting.

Let’s go for the gold in the first post: The Pratt & Whitney R-4360 Wasp Major, the largest mass-produced aircraft piston engine ever made. A 28-cylinder, 71-liter, air-cooled radial monster, the ultimate incarnation—the “51VDT”—could deliver a staggering 4,300 hp. Even the first versions of the R-4360 could crank out north of 2,500 hp. Initially “just” supercharged, the final evolution of the Wasp Major incorporated a turbocharger as well.
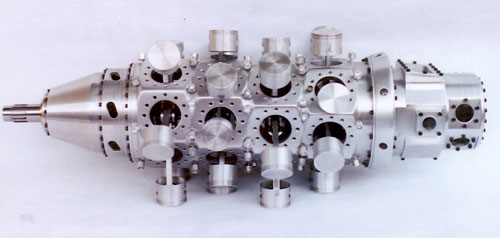
Pratt & Whitney R-4360 Wasp Major case assembly crankcase pistons

As illustrated above by a view of the engine’s crankcase, the four rows of seven cylinders were offset radially to allow cooling air to reach the rear rows; even so, there were teething problems getting temps under control in the rearmost cylinders. The mixture powering each piston was ignited by two spark plugs per cylinder, meaning a full 56-plug change was a full-day job for a mechanic. Fuel injection was in its infancy during the R-4360’s gestation, so a pressure carburetor (with a concept similar to single-point injection) metered fuel to the engine.

Applications? The Wasp Major powered some of the largest and most potent aircraft of its time, including six for the Convair B-36 Peacemaker, and four for both the Boeing B-50 Superfortress and Northrop’s pioneering B-35 flying wing. More recently, the R-4360 has found success in pylon-based air racing, the re-engined Hawker Sea Fury Dreadnought clinching gold in the Unlimited class at the Reno Air Races in 1983 and 1986.

Perhaps one of the most amazing aspects of the Wasp Major arises not from the engine itself, but from the turboprops and jet engines that replaced it. Consider, for example, that eight R-4360s were necessary to lift Howard Hughes’ admittedly gargantuan Spruce Goose just 70 feet off the water for a mile. And nowadays, a jetliner of roughly the same size and gross weight like the Boeing 777-300 is accelerated to speeds and altitudes unheard of during the Wasp Major’s heyday with just two General Electric GE90 turbofans. It says a lot for the quantum leap in efficiency and reliability that the 777’s engines are arguably less complex than the R-4360 even as they develop an order of magnitude more power. We’ve made amazing technological progress in the past 60 years, but that doesn’t dampen a bit of the Wasp Major’s fascination.

Editor’s note: This post is part of an ongoing series examining unique and significant powerplants. Read the other installments here:

13 Comments on Interesting Engines:
The Pratt & Whitney R-4360

In Defense of Manual Chokes

July 24, 2012 by Matt

Choke Knob

Thought about this whilst mowing my lawn Sunday afternoon. The mower had run out of gas in the middle of the back yard, and after a refill, it took me a good minute and a half of yanking on the cord to restart it. The reason for the difficulty? The automatic choke on the mower’s carburetor had reset itself and was delivering a rich mixture to an already-warm engine. Well, that and the float bowl was drained from having run out of gas… But I digress.

It used to be the case that almost all carbureted cars were fitted with a knob or lever somewhere in the cockpit that gave the driver control over the carb(s)’ choke. What does a choke do? In simple terms, it controls the ratio of air to fuel entering the engine. A cold engine needs a rich mixture, and a warm engine needs a lean mixture. Upon a cold startup, the driver would engage the choke, richening the mixture, and gradually back it off as the engine warmed.

But modern engine management has superseded all that. A fuel injection system’s electronic brain controls the A/F ratio far more precisely than a human ever could, and in response to the direct needs of the engine, not a driver’s vague sensing of those needs. Also, unlike another “holdover” from days when drivers had more control over their vehicles—the manual transmission—with which there are substantial, objective benefits over an automatic, there’s absolutely no downside to computer control over the mixture. From an engineering and practical standpoint, EFI is a lock.

So what’s the point? Well, truth be told, this post really is the equivalent of an audiophile pining for the added character of a vinyl record over the cool sterility of the thoroughly superior compact disc. As with carbs in general, the patina of a manual choke control’s presence engages the driver with the car in an irreplaceable way. Yes, it helps to know a bit more about the inner workings of the engine, and no, I wouldn’t pine for the good old old OLD days when drivers had to manage non-synchromesh gearboxes or control spark advance, but so help me, I do miss that little plunger knob on my old RX-7’s dash that read “CHOKE.” Heck, it even had a vacuum servo to retract it in case I forgot to when the engine warmed up, but just knowing it was there…

With respect to how much we let our cars “do for us,” I’m convinced everyone has their sweet spot. Again, there are certain functions I’m more than happy to let automated systems handle. But for my part—and maybe it’s a comfort/security thing—a few more buttons and controls, such as the aforementioned choke knob, would be welcome.

2 Comments on In Defense of Manual Chokes

Datsun 240Z Restoration:
VIN Discoveries

July 2, 2012 by Matt

1972 72 Datsun 240Z S30 Registry Snapshot

I’ve never seen this before.

A helpful Spannerhead passerby commented on an older post in my 240Z restoration series, shedding some light on my engine block / VIN mismatch mystery.

To recap, although my dad, the Z’s original owner, swears up and down the engine in the car is original—and I believe him—it remains that the engine’s block number, and the number stamped on the car’s shock tower ID plate do not match. The number stamped on the engine block is 118555, and the ID plate’s number reads 110555. Up until this point, the going theories were, in decreasing order of likelihood:

  1. The original engine was somehow defective before my dad bought the car new, was replaced before he bought it, and the installer made a mistake when applying the number to the block.
  2. The engine was surreptitiously replaced when my dad had it rebuilt in the mid-’90s, and once again, the installer screwed up when scribing the block number.
  3. The Nissan factory made a mistake.

What made that last theory particularly improbable is simply the fact that the block number and ID plate have no other purpose but to match. I mean, that’s their only job, and it stands to reason that the dozens, if not hundreds of pair of eyes that saw the numbers between the time the car was being assembled and the time my dad drove off the showroom lot would have caught something.

However…it now appears the ID plate, not the block, is wrong. Check it out: My car’s VIN is 93069, and according to the registry information provided by the helpful commenter, 118555 would mesh perfectly with the block number range the VIN corresponds with. So, wonder of wonders, the ID plate, stamped from the Nissan factory in Japan, an item with no other purpose but to match with the block, is wrong. It’s like waking up one morning to find a misspelling on your driver’s license… Just bizarre. And surprising.

Editor’s note: This post is Part 18 of an ongoing series chronicling my efforts toward the restoration of my 1972 Datsun 240Z, originally my father’s. Read the other installments here:

26 Comments on Datsun 240Z Restoration:
VIN Discoveries

Amazing: Stop Motion Engine Rebuild

June 30, 2012 by Matt

Here’s a little edutainment for a scorching Saturday afternoon: One of the most incredible car-related videos I’ve seen. As much as we admire guys who meticulously chronicle their restoration or upgrade project, the builder of this Triumph Spitfire engine is on a whole other level, stringing 3,000 pictures together into a 2-and-a-half minute snapshot of his project.

One of the best things about the clip is the fact that’s it’s informative as well. Any seasoned shadetree mechanic has at least a basic understanding of the major jobs that go into rebuilding an engine, but there’s something about seeing the whole process packaged, as it were, into a bite-size morsel that helps bring the endeavor into perspective. As different as it is from my own restoration project, I have a feeling I’ll be coming back to the clip for inspiration more than once.

6 Comments on Amazing: Stop Motion Engine Rebuild

Datsun 240Z Restoration: The Bad News

June 18, 2012 by Matt

This is where I get depressed. Or overwhelmed. Take your pick.

The video above represents a brief walkaround of the Z, and touches on many of the issues to be addressed in the restoration, including the visible rust and some interior problems.

It’s…daunting, to say the least. I posted the video on a reputable Z-car forum and while most of them agree it’s salvageable, the process will invariably entail a significant amount of time, effort and money. No less a mainstay of the Z community as Carl Beck chimed in with figures of 650 hours and $30,000, though admittedly, those were his numbers for this concours-quality restoration. I don’t want a show car, just something clean and completely rust free in which I can have fun on the weekends. The Z obviously won’t see a snowflake ever again, and if I can help it, nary a raindrop either. So that figure could potentially be revised downward, but…it’s still enough to cause sticker shock. I’ll have a better handle on the real figure in a couple of months when I start disassembling the car and all the hidden rust comes to light. Onward…

Editor’s note: This post is Part 17 of an ongoing series chronicling my efforts toward the restoration of my 1972 Datsun 240Z, originally my father’s. Read the other installments here:

6 Comments on Datsun 240Z Restoration: The Bad News

Datsun 240Z Restoration: On The Road

June 10, 2012 by Matt

Alternate post title: I need a camera mount. Badly.

Alternate post title #2: Glimpses of future greatness at 4000 rpm.

Note: The “thoroughly depressed” line at the beginning references another series of clips I shot right before the drive, inventorying many of the car’s “trouble areas.” That video will be featured in a future post in this series.

So, after working like a crazy person getting the driveline reassembled on Monday, the needed brake bridge didn’t arrive until Wednesday, leaving me with hours to install it, bleed the hydraulic and work out what bugs I could via a few test drives that evening, in order to confirm the car was at least passably roadworthy for the following morning, when I drove my son to school in the Z for his last day of 1st grade.

And aside from mushy brakes (investigation still underway) and mysterious timing problems (solution TBD), the car performed like a champ, and he greatly enjoyed his ~2 mile drive to school.

So what’s the plan now, since I’ve gotten it running again? Enjoy it for a bit, while fixing the remaining running issues. In the meantime, I’ll tackle additional home projects, make time for family activities over the summer, and prepare the garage for the teardown. Even after completing the perimeter storage system, there’s still quite a bit to be done:

  • Cut back the castering work table to make room for the table saw and eventual purchase of a tool chest
  • Build a hanging shelf in the center of the garage for doors, fenders, hood, and other large car pieces
  • Score a parts cleaning tank and possibly a media blasting cabinet

Among other things. So there’s still a long way to go. But the memory of how it feels to row through the gears and haw at the thin wooden steering wheel is fresh, and motivating.

Editor’s note: This post is Part 16 of an ongoing series chronicling my efforts toward the restoration of my 1972 Datsun 240Z, originally my father’s. Read the other installments here:

4 Comments on Datsun 240Z Restoration: On The Road

Datsun 240Z Restoration:
Getting It Back On The Road

June 5, 2012 by Matt

Datsun 240Z Restoration Driveshaft Axle Shafts Halfshafts Diff Differential Subframe Rear Suspension Mustache Bar

Very sore today. I’ve been going full steam trying to get the Z back on the road before this Thursday, since it’s my son’s last day of 1st grade and I promised him I’d drive him to school in it.

The upshot is that after spending most of the last month “topside,” getting the engine running, these past few weeks have seen me mostly under the car, up to my elbows in dirty, cramped brake, clutch and driveline work.

In a nutshell, I’ve:

  • Replaced the clutch master cylinder, slave cylinder and rubber line
  • Replaced the brake master cylinder and rubber lines and rebuilt all four brakes
  • Replaced the transmission’s rear oil seal
  • Added new trans fluid (Red Line MT-90)
  • Replaced the differential cover gasket
  • Added new gear oil to the diff (Red Line 75W-90)

And now for some pictures:

Datsun 240Z Restoration Driveshaft Axle Shafts Halfshafts Diff Differential Subframe

These are all the parts that had to come off for me to be able replace the cover gasket on the diff. The axle shafts in particular were a bear to remove. More modern CV joints and circlips make life much easier.

Datsun 240Z Restoration Diff Differential R180 Crown Gear Carrier

The internals of the diff looked relatively unscathed after 40 years. However, to my recollection, there is a pronounced whine from the diff whilst driving, something that will be looked into further during the full restoration phase.

Datsun 240Z Restoration Diff Differential Gasket Breather Baffle Plate

Interesting find: There is a (apparently non-OEM) baffle for the diff breather sandwiched in between two cover gaskets. It was a bit annoying to have to order another gasket, but I’m glad it’s there.

Datsun 240Z Restoration Drum Brakes Rear Wheel Cylinder Piston Backing Plate

I despise drum brakes. Yes, I’ve heard all the arguments for how a disc conversion is expensive, and that my braking performance will likely actually decrease slightly, but to not have to deal with pulling off drums that are fused to the hub, or rebuild ornery wheel cylinders… I would pay quite a bit. And of course, there’s also the fact that discs just look better.

With any luck, I’ll have it on the road for a test drive tonight. Just need to bleed the clutch and brake systems and we’ll be good to go. Video (hopefully) forthcoming.

Update: (9:05 PM) The required brake bridge didn’t come in tonight, as promised. Frustrating. Won’t have a whole evening to tune it before Thursday, but…I’ll make the best of it. Disappointing.

Editor’s note: This post is Part 15 of an ongoing series chronicling my efforts toward the restoration of my 1972 Datsun 240Z, originally my father’s. Read the other installments here:

1 Comment on Datsun 240Z Restoration:
Getting It Back On The Road

Datsun 240Z Restoration: It Lives!

May 18, 2012 by Matt

A small victory.

So nice to have this under my belt. After ordering all the parts on my spreadsheet:

Datsun Nissan 240Z L24 Parts

I set about getting the Z’s engine running, even if the car itself isn’t yet mobile. Here’s what was done:

  • Replaced all engine bay coolant hoses, replaced coolant
  • Drained, cleaned and re-sealed fuel tank
  • Flushed all fuel hardlines and replaced all rubber lines
  • Set valve clearances, replaced valve cover gasket:

Datsun Nissan 240Z L24 S30 Engine Motor Cam Camshaft Fuel Pump Sprocket Gear

  • Removed intake manifold coolant pipe and plugged passages
  • Had carbs rebuilt
  • New battery
  • Replaced thermostat, oil pressure sensor, fuel pump and filter…

…along with a few other odds and ends. Filled the tank with a few gallons of 93, added 5 fresh quarts of 15W-40 Rotella T heavy duty oil (love the stuff) and a new filter, and on Wednesday evening…cranked it. The results of the first attempt can be found here—while the engine started, it immediately began to cycle between racing and bogging in the exact manner it had before I parked it eight years ago. By juggling the choke and throttle, I managed to stabilize things long enough for the engine to warm up, at which point I was able to use the idle screw to keep it running. But the engine was still missing and sputtering, something obviously wrong.

I was bummed. I didn’t hear any knocking or tapping that would indicate internal damage from the no-oil-pressure incident, but I wondered if somehow the cycling idle might be caused by something I’d done, though I wasn’t sure how it could be connected to a loss of oil pressure without some accompanying metal-on-metal noise.

Still, as another Z owner pointed out, it started, it stayed running, and it didn’t overheat. So there was that. The critical bit of information came from yet another Z owner, Frank in Houston, who right away saw that the outlet pipe on the balance tube for the (removed) air pump was unplugged, creating a huge post-throttle vacuum leak. The behavior of the engine on first startup was so dramatic that I didn’t see how plugging the pipe would make a substantial difference, but…did it ever. The surging idle completely disappeared, replaced by a perfectly-running, docile and tractable still-untuned engine. Amazing. And extraordinarily encouraging.

The upshot is that the engine wasn’t ruined by the no-oil-pressure incident, so I’ll simply pull it and clean it up in lieu of totally rebuilding it, reducing the cost and time of the restoration exponentially.

Now I’ve just got to get it back on the road for a “last hurrah” before I park it for the resto, which means…brakes and clutch time. Onward!

Editor’s note: This post is Part 14 of an ongoing series chronicling my efforts toward the restoration of my 1972 Datsun 240Z, originally my father’s. Read the other installments here:

5 Comments on Datsun 240Z Restoration: It Lives!

The Engine Swap Hall of Fame:
4-Rotor Mazda RX-7 FC Build

April 23, 2012 by Matt

4 Rotor Mazda RX-7 FC Build Project 2nd Gen FC3S 26B John Huijben RX7Club

This build isn’t even done yet, but the engineering and fabrication is so stunning that I feel compelled to feature it.

The skinny? It’s custom-engineered, 2.6l, peripheral port, 4-rotor Wankel engine transplant into a 2nd generation (FC) Mazda RX-7. Every piece is so jewel-like that it’s difficult to know where to begin.

John Huijben, an engineer and machinist based in the Netherlands, decided on a bit of a whim to put this engine together in his spare time. In his words, it’s more of an engineering exercise than anything else, and not meant to be a part of a fully integrated car. Put another way, it isn’t remotely the most practical or sensible way to build a powerful RX-7, but Lord help me if it isn’t absolutely fascinating. My kind of project, in other words.

4 Rotor Mazda RX-7 FC Build Project 2nd Gen FC3S 26B John Huijben RX7Club

Here’s the shell: a basic Series 4 (’86-’88) RX-7, a touch rusty, stripped down the degree it’ll have to be to accept the engine.

4 Rotor Mazda RX-7 FC Build Project 2nd Gen FC3S 26B John Huijben RX7Club

One of the build thread’s highlights is the CAD work. Stunning exploded views precede almost every major update and illustrate the benefits of careful design over a less thought-out, more improvised approach to engine building.

4 Rotor Mazda RX-7 FC Build Project 2nd Gen FC3S 26B John Huijben RX7Club

The slide throttle in particular is a complete work of engineering art. Less restrictive than a conventional butterfly throttle, especially at WOT, its design and implementation are peerless.

4 Rotor Mazda RX-7 FC Build Project 2nd Gen FC3S 26B John Huijben RX7Club

The part of the 4-rotor build that takes the cake, though, has to be the custom eccentric shaft (a rotary’s equivalent of a crankshaft). Instead of mating two e-shafts from smaller, 2-rotor engines, Huijben decided to design and machine his own custom piece from a solid steel billet (shown at top in photo above). Given its precise balancing, oiling and harmonics requirements, it’s a tour de force of engineering.

I’ll definitely be keeping up with the build’s progress. Can’t wait to see it come to life for the first time!

H/t to Aaron for the link to the build. Thanks!

Editor’s note: This post is part of an ongoing series showcasing awesome engine swaps and builds. Read the other installments here:

10 Comments on The Engine Swap Hall of Fame:
4-Rotor Mazda RX-7 FC Build