Spannerhead Dot ComSpannerhead.com

Posts filed under ‘Tinkering’

Datsun 240Z Restoration: Dashless

September 8, 2016 by Matt

240Z-no-dash

The dash came out a few weeks ago with little drama. After unhooking the HVAC ducting and removing (what I thought) were all the fasteners, I disconnected the cables from the heater box and tried to pull it out. No dice. Turns out there are a pair of bolts at the very corners of the dash pad up near the base of the windshield that I had missed. These removed and a little elbow grease brought the whole assembly out the passenger door without much trouble.

240Z-no-dash2

Once out, I took out the heater box. Many of the flappers were rusted in place; will have to go over this, free them up and recondition. I removed the firewall insulation, fresh air ducts and hooked up the steering column again. The brake and clutch pedals and a few other things are attached to the column mounting bracket. Once it’s removed they’ll come down too.

All the car’s wiring harnesses converge behind the glovebox area, so it took a fair amount of labeling with blue tape to keep everything straight. I’ve been religious about keeping fasteners in labeled bags, but it occurred to me that I’ve been neglectful in simply keeping a record of the sequence in which components have been removed from the Z. Without this, it’s going to be a real mystery come reassembly time as far as what gets reinstalled first. Beyond the remaining few bits I need to remove under the rear of the car, my task now, before too much time passes, is to go over the car and remember the order in which I removed bits. Shouldn’t been too hard, and even if I’ve forgotten a thing or two, whatever I have should be a good guideline to go by.

Editor’s note: This post is Part 24 of an ongoing series chronicling my efforts toward the restoration of my 1972 Datsun 240Z, originally my father’s. Read the other installments here:

4 Comments on Datsun 240Z Restoration: Dashless

Datsun 240Z Restoration:
Gutting the Interior

August 24, 2016 by Matt

rear2

I’ve been chipping away at it, 15 minutes here, an hour there… It’s amazing how much progress you can make after a few weeks of piecemealing it. Would I prefer a large chunk of time—say, an afternoon? Sure. But I’ll take what I can get, and at the moment, the car is very close to being ready to go to paint.

rear3

Starting at the rear, I removed the fuel tank and all the hatch trim. The taillights, finishing panel and rear bumper came off. The rub strips, which I loathe, were very difficult to pry off, and the body guy is going to have some restorative work to do to smooth out the holes and dimples their removal left behind.

rear1

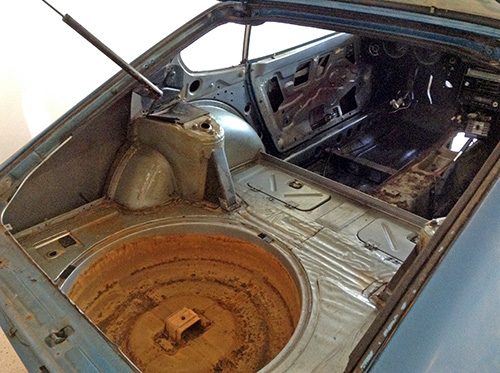
The scary-looking rust in the spare wheel well isn’t structural, fortunately. All the red vinyl diamond-pattern upholstery came off too. I fished the rear wiring harness around the right rear wheel well and removed the quarterlights.

cowl1

The door panels came off with little drama (I love my set of blue plastic interior trim tools!). I removed the steering column to make way for the eventual dash extraction. I took out the windshield washer motor and linkage and gave everything a good once-over with my shop vac. There were a lot of pine needles in the cowl area, some (most?) of which had probably been there for 30-40 years, assuming they can last that long…

It’s been interesting to see what the painters chose to remove and what they left in during the 240Z’s blue repaint back in the 1970s. Some things I’d have thought would have been tough to pull were left in, and other bits were painstakingly removed. Regardless, the car’s all going back to its original 901 Silver.

Very encouraged by the progress. Next up is the dash itself, the final removal of the wiring harness, the heater core and then the rear-end mechanical bits like the diff and brake lines. Onward!

Update: Since drafting this post, I’ve removed the dash. More on that in the next installment.

Editor’s note: This post is Part 23 of an ongoing series chronicling my efforts toward the restoration of my 1972 Datsun 240Z, originally my father’s. Read the other installments here:

10 Comments on Datsun 240Z Restoration:
Gutting the Interior

Datsun 240Z Restoration:
The Teardown Begins

April 18, 2016 by Matt

240Z_noseoff1

Finally, some progress.

So I obviously haven’t made a lot of headway here in the past couple of years. Our previous installment took place in the spring of 2014, and since then, the Z has just been up on jackstands, languishing in the garage.

With the acquisition of the BMW back in January, I’ve been motivated to move the Z project forward so that, eventually, I can move it out of the garage to make room for the Bimmer to take up permanent residence. First, though, I had to put in place the element missing from the project for years, and one of the main things holding me back: Storage space.

Zstorage1

That’s the utility room off the back of our garage. On the opposite wall (not pictured) are a whole other swath of shelves holding household items, and the shelves shown in the picture are exclusively for Z parts. Disassembly essentially doubles the amount of room needed for a car, so without space for bumpers, fenders, seats, mechanical bits and the like, progress was stifled. What’s more, without a concrete organizational system, I just wouldn’t have been ready to dig into the project in a methodical fashion, an absolute must for a restoration effort.

240Z_noseoff2

By today’s standards, the Z really isn’t that complicated. But it’s complex enough—there are a number of overlapping subsystems, fasteners and other components. The storage space has really taken a load off my mind re:moving forward.

The actual disassembly so far, undertaken this past Saturday and Sunday, was quite straightforward and incident-free. I will sing the praises of the world’s best penetrant, PB Blaster, until my dying day. Most of the rubber weatherstripping and other pieces like hood bumpers and brake and fuel line grommets disintegrated, but that’s to be expected after 44 years. I broke a couple of bolt heads, but nothing terminal and the whole process felt a bit like an archaeology dig as I peeled away layers of peripheral parts like the brake booster and wiring harness. I was disheartened to see more rust than I had anticipated (there’s always more than you think there is), but encouraged by the fact that, upon inspection, both fenders may be usable in their entirety. We’ll have to see what the body guy says when he takes a look.

Editor’s note: This post is Part 22 of an ongoing series chronicling my efforts toward the restoration of my 1972 Datsun 240Z, originally my father’s. Read the other installments here:

No Comments on Datsun 240Z Restoration:
The Teardown Begins

Datsun 240Z Restoration:
…And the Engine Comes Out

August 20, 2014 by Matt

Datsun 240Z restoration engine motor l24 engine removal

Figured I would give you all an update, even though there are fairly significant changes to the project coming down the pike. But more on that in a future post.

After towing the Z over the Appalachians on a car carrier behind my new truck, I ensconced it in our new garage here in Tennessee. And eager to make a little progress on the project, a few months ago I removed all the peripheral bits, fired up the engine hoist and pulled the engine and transmission.

It was a very straightforward job. Nothing jumps out in my memory as a particularly difficult task. Even the exhaust manifold-to-downpipe bolts, encrusted with 40+ years of rust, once soaked overnight with a generous dose of PB Blaster, loosened easily after getting a good set with a 6-point socket.

Datsun 240Z restoration engine motor l24 engine removal

One challenge was finding a couple of locations to actually hoist the engine from. The engine was rebuilt sometime in the mid-’90s, and apparently, at some point, the engine hoist brackets were removed from their usual locations, so I had to improvise with a pair of long bolts threaded into suitable locations on the cylinder head. But it all went smoothly; the engine and transmission came apart just fine, but I did have to remove the flywheel in order to be able to mount the engine on a stand, where it sits now in our garage.

I’ve been referencing Wick Humble’s classic How to Restore Your Datsun Z-Car as a sort of loose guide for the project, and removing the engine was the first step in the disassembly process. The next series of steps involve removing more mechanical organs before unbolting fenders and other body panels, but it’s an open question at this point as to whether I’ll be doing that. More to come.

Editor’s note: This post is Part 21 of an ongoing series chronicling my efforts toward the restoration of my 1972 Datsun 240Z, originally my father’s. Read the other installments here:

7 Comments on Datsun 240Z Restoration:
…And the Engine Comes Out

Top Fuel Dragster Engineering, Part 2

July 25, 2013 by Matt

5-Disc Clutch Top Fuel Dragster

After the awesomeness of the first installment, I can’t resist putting up a link to the second part, wherein the author geeks out on the intricacies of actually putting 10,000 hp to the ground. Fascinating details abound, like 5-disc clutches, crazy rear tire deformation at full speed and 5.5 g launches. Enjoy.

Image credit: motoiq.com

1 Comment on Top Fuel Dragster Engineering, Part 2

The Brilliant Lunacy of
Top Fuel Dragster Engineering

June 25, 2013 by Matt

Top Fuel Dragster Racing Engine Motor Block

If my racing tech represents “arrested development” (the way that of all major series except endurance racing), I’d rather go all out. In other words, if I can’t geek out on technological breakthroughs in the racing machines that interest me for the simple reason that the technology in my 7-year-old minivan is in many ways more advanced, I can at least remain in awe of those who push a specific formula to its complete, utter, ludicrous limits.

Like these guys.

Top Fuel drag racing represents the elephant man corner of motorsports. It’s the freak show. The bearded lady and conjoined twins sit in the audience, cheering on these cars-in-name-only, distorted out of all resemblance to anything you or I would drive to the grocery store. The machines are designed to do one thing extraordinarily well, do that thing for about 4 seconds, then stop doing that thing. In what other arena of competition, nevermind just motorsports, is the window of opportunity for success so small? All the sound and fury of an entire NASCAR race, compressed into a handful of ear-splitting, pavement-cracking moments. How can I look away?

The tech in particular fascinates me. Sure, it’s not envelope-shattering in the innovative sense, but the amount of attention lavished on every decision combined with the sheer scale of it all, from distributor size to exhaust gas temperature to speeds to decibels to power output… I just can’t help but stand and gawk at it all. The above article does a great job documenting the geeky details of a Top Fuel racer’s engine prep. Check it out!

Image credit: hotrod.com

1 Comment on The Brilliant Lunacy of
Top Fuel Dragster Engineering

PSA: Injury Hiatus

June 15, 2013 by Matt

TopHospitalsweb

Well, my new (to me) car got its pound of flesh. Eerily similar to an injury I had to my pinkie about ten years ago when working on my Supra’s driveshaft (you’d think I would have learned), the BMW’s left front wheel hub backing plate made a nice incision in my middle finger while undergoing a damper replacement, requiring five stitches. I was buttoning up a Koni Sport install, tightening the sway bar end link on the strut bracket and…the wrench slipped. As much as I’ll miss the tactile nature of car work with bare hands, I think it’s time to invest in a good pair of work gloves.

So, faithful readers, everything will be just a little slower for a few days while my finger heals, including updates. I’ll do my best to have some original content up in the next few days. In the meantime, check out our archives, featured series or one of the excellent blogs on the sidebar. Cheers!

4 Comments on PSA: Injury Hiatus

A Local Build: Carl’s Hardy & Beck BMW 630CSi

June 3, 2013 by Matt

Hardy and Beck BMW 630CSi E24 Restomod Carl Pardue

Carl’s resto-mod 1977 BMW 630CSi might not be everyone’s cup of tea, but it’s hard to knock the thoroughness of his execution.

Originally the poster BMW E24 6-Series for the tuning outfit Hardy & Beck, Carl came across it in 2009 and fell in love with the car and its history. After completing one of the most comprehensive Z3 M Coupe turbo builds in the country, he trained his sights on the E24, determined to infuse the car with his unique vision.

Hardy and Beck BMW 630CSi E24 Restomod Carl Pardue

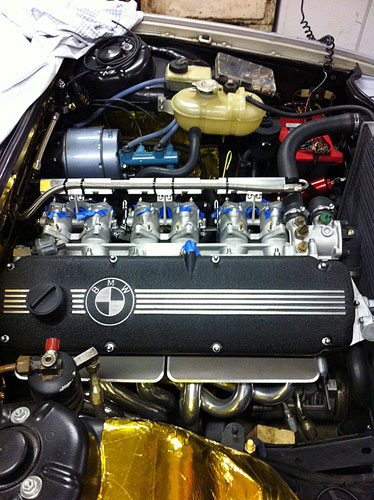
The idea for the engine is to create the highest-output naturally-aspirated M30, retaining as much of its character while turning everything “up to 11,” so to speak (and hopefully still remaining somewhat streetable). Meticulously prepped, the engine features custom 10.8:1 compression Wiseco pistons and TWM Induction individual throttle bodies (ITBs). The M30’s 2-valve cylinder head has never been known as a paragon of breathing efficiency, but Carl’s build will definitely explore the upper limit of its capabilities.

Hardy and Beck BMW 630CSi E24 Restomod Carl Pardue

Hardy and Beck BMW 630CSi E24 Restomod Carl Pardue

The interior has been completely overhauled as well, with new seats, upholstery and freshened details. It’s not original, but it all fits together somehow, and it’s special, and that counts for something. Will be following the remainder of the build with interest.

15 Comments on A Local Build: Carl’s Hardy & Beck BMW 630CSi

Datsun 240Z Restoration:
Treasure Hunting

April 22, 2013 by Matt

Datsun 240Z Junkyard

Beautiful day for a junkyard visit.

A week or so ago, I tracked down a used coolant overflow bottle for our minivan at the local Pull-A-Part location. I’ve been to you-pull-it junkyards before, and I have absolutely no affiliation with the company, but this one was in a whole different league—clean, well-stocked, organized and efficient. It didn’t take me long to track down the part, and I took some time to scout the yard for desirable cars.

I forgot how much I love junkyards. Sure, it’s sad to see cars in such states of decay, but the variety on the lot presented a great opportunity to get a first-hand look at the mechanicals of some cars, such as an early Saab 900 or Alfa Spider, that I’d only seen in pictures on the Internet. It’s a car tech geek’s paradise.

So after my first visit for the coolant bottle, yesterday I returned for some Z parts. The orange-on-white ’72 240Z at top was my initial focus, but I scouted out some others as well, including a 2+2 280ZX:

Datsun 280ZX Junkyard

and a non-turbo Z31 300ZX:

Nissan 300ZX Z31 Junkyard

Neither had many salvageable interior bits, both both their engines were intact.

My two main scores were a 6-2-1 header off the 240Z:

Datsun Nissan 240Z L24 L26 L28 Exhaust Header

and an under-hood service light:

Datsun 240Z under hood light

I’m hoping the header will clean up. It seems to be intact. If not, no big deal. Removing it was a bear; since I didn’t have a hacksaw, I had to rip the whole exhaust off, and ended up having to pull the steering column and twist the crusty muffler off before fishing it out the hood. As for the service light, the aluminum body should clean up, and my intention is to simply buy a new plastic lens, if it’s available. I’m strangely optimistic about that; in my experience with car restoration, sometimes the little ticky-tack stuff can be had more readily than more desirable NLA parts like door weatherstripping and interior plastic components.

If nothing else, it was a fun couple of hours exploring the yard and tearing into a classic Z with wild abandon.

Editor’s note: This post is Part 20 of an ongoing series chronicling my efforts toward the restoration of my 1972 Datsun 240Z, originally my father’s. Read the other installments here:

7 Comments on Datsun 240Z Restoration:
Treasure Hunting