Spannerhead Dot ComSpannerhead.com

Posts filed under ‘Technical’

Datsun 240Z Restoration: Wheel Work

February 2, 2012 by Matt

Datsun Nissan 240Z S30 Drum Brake Rear Suspension Hub Axle Shaft

Happy Groundhog Day! A few minor updates from the Z restoration front:

  • The Z’s right rear brake drum (pictured above) decided to seize up a few weeks ago. The wheel cylinder was evidently on its last legs, and after one too many applications of the parking brake, refused to unclamp the shoes from the inside of the brake drum. So, I can remove the drum from the hub (the typical challenge) just fine, but the shoes are still dug into the drum like a pair of rabid pit bulls. I’m going to try a few more tricks tonight. In related news, I hate drum brakes.
  • In the wake of my tactical adjustment detailed in the last post, I’m assembling a spreadsheet of parts I need in order to try to start the engine. I’ve been using this site as a part number reference, with the understanding that not everything I need has to be new from Nissan. In particular, wear items like brake pads and shoes and other bits like brake and clutch master cylinders can be remanufactured items. It’s been a challenge compiling part numbers and prices, but I’m slogging my way through it.

BF Goodrich Radial Comp T/A TA 14 225/60-14 wheels rims tires

  • The removal of the wheels for brake service presented me with the opportunity to take some measurements. I was pleasantly surprised to find they’re wider than I thought they were, at 14 by 7 inches. The stock tire size is 195/70-14, but on a 7-inch-wide wheel I could go all the way up to a 225/60-14 without trouble, which is a lot of rubber for a 2350 lb car. I have a soft spot for vintage muscle car tires with raised white lettering, so what I would like to do is acquire a set of BF Goodrich Radial T/As (shown above). They would complement the look and feel of the car perfectly. But…we’ll see whether those are in the cards.
  • ZTherapy received my carbs yesterday and, as expected, diagnosed the carb bodies as being too far gone to salvage. The company’s been under new management for the better part of 10 years now, after 5 or so with the original owner (who originally rebuilt my carbs), and has spent an inordinate amount of time repairing units damaged by the original owner’s remanufacturing process. The upshot for me is that reconditioning them will be more expensive than I had anticipated, but the new techniques used in adding the bearings to the throttle shafts (ZTherapy’s signature service) will last the life of the carbs; in other words, indefinitely.

Editor’s note: This post is Part 8 of an ongoing series chronicling my efforts toward the restoration of my 1972 Datsun 240Z, originally my father’s. Read the other installments here:

10 Comments on Datsun 240Z Restoration: Wheel Work

Atomizing Fuel: Continuous Injection

January 30, 2012 by Matt

Audi 4000 4K CIS K-Jetronic K-Jet CIS-E Bosch

Bosch’s proprietary continuous injection system (CIS), also known as K-Jetronic or K-Jet, is an interesting hybrid of mechanical and modern fuel injection.

First fitted to the early ’70s Porsche 911, CIS was eventually adopted by a whole host of European automakers, from Audi and VW to Volvo, Ferrari and Lotus. It functions exactly as its name would suggest: Fuel is pressurized by the pump and metered continuously to injectors near the engine’s intake ports, the flow rate controlled by a movable circular plate mounted in the intake stream, attached to the fuel distribution unit. CIS resembles mechanical fuel injection in that there’s a direct relationship between the position of the plate and the flow of fuel, but does allow for some electronic control and closed-loop O2 sensor feedback. It straddles the two methodologies, developed before mass production of fully digital fuel injection was realistic, but band-aided in its later years as a less expensive stopgap system while Bosch’s much more advanced digital Motronic system came to market.

Advantages? It’s cheap, and once properly dialed-in, very reliable. CIS’s rudimentary nature (read: lack of sensors) eliminates many potential failure points, and the basic components used to deliver fuel—the injectors and fuel distributor / air flow plate assembly—are quite robust. Compared to the carbureted systems it replaced, CIS offers the ability to meet a broader envelope of engine fueling requirements, was considerably more efficient while still being emissions-compliant, and isn’t nearly as affected by weather vagaries or other environmental factors.

CIS K-Jetronic K-Jet CIS-E Bosch Diagram Schematic Drawing Operation

Downsides? Fuel metering, while more precise than most carburetors, still isn’t as accurate as sequential common-rail port injection. Additionally, the presence of the air flow plate and fuel distribution constrain the intake path considerably. Air has to flow up through the plate and then embark on whatever twists and turns it must make in order to reach the cylinders. By contrast, the metering unit of fuel injection with a flapper-door AFM or MAF sensor can be positioned wherever it needs to be to optimize the intake path. And finally, CIS is constrained by its semi-mechanical nature, lacking flexibility in the face of ever-changing emissions and efficiency requirements.

I drove a CIS-equipped car for the better part of 3 years. After an initial pig-rich condition was sorted out by a local specialist, the car’s fuel injection system ran perfectly and required absolutely nothing of me for the remainder of our time together. CIS is unique and certainly doesn’t readily surrender its secrets, but I grew to respect and appreciate the durable nature of the system Bosch developed.

Editor’s note: This post is part of an ongoing series highlighting various obsolescent methods of fuel delivery. Read the other installments here:

No Comments on Atomizing Fuel: Continuous Injection

Datsun 240Z Restoration:
Tactical Changes

January 22, 2012 by Matt

SU Carb Carburetor Carburettor 240Z Datsun L24 3-Screw

There’s been a slight change of plans.

Up until this point, my restoration strategy had comprised three phases: Preparing the garage, restoring the body and interior, and rebuilding the engine. The third phase was necessitated by the fact that in early ’04, I had run the Z’s engine without oil pressure for about three-quarters of a mile. Even after a fresh oil change, the car exhibited somewhat odd behavior after being started, characteristics I had chalked up to my carelessness.

But after consulting with knowledgeable Z enthusiasts, I’ve decided to try to start the engine in hopes it’s not irrevocably (or at all) damaged. Why try to start it instead of just rebuilding? A few reasons:

  1. All the parts and work necessary to start the engine I’d have to invest anyway. It makes no difference whether the engine is rebuilt or in its current state, fuel lines, spark plugs, gaskets, battery, etc, are going to have to be replaced.
  2. I can do the work on the Z while simultaneously prepping the garage. The main goal of garage preparation is storage and organization. Just getting the Z running doesn’t require a long-term home for any of the (few) bits I’d pull off. Those two efforts can move forward in parallel.
  3. The behavior the Z displayed after the no-oil-pressure incident wasn’t a sure sign of internal damage. There were no metal shards or flakes in the oil after the incident. When I started the Z’s L24, the engine would cycle between bogging and racing, but… I had had some issues tuning the carbs, and had just replaced the distributor points—two factors that could cause the behavior in question all by themselves. As one Z buff put it, “Let the engine tell you what’s wrong,” rather than jumping to conclusions about what, if anything, is amiss internally.
  4. It would save a huge amount of time and money if the engine is at least somewhat okay. The most obvious advantage of the new tactic. What a load off my mind if the body and interior restoration—daunting as it is—is the sole focus of my efforts to bring the car back to 100%.

So with that in mind, I pulled the SU carbs (shown at top) off the engine earlier this evening to send them back to ZTherapy for refurbishment. They’d been remanufactured by the Oregon outfit about 15 years ago, but I had been getting a vacuum leak around the throttle shaft—the very issue the ZTherapy process focuses on curing. So we’ll see what they say.

After that, it’s just a matter of replacing almost every rubber hose on the car, loads of gaskets, new brake and clutch master cylinders, new plugs, battery, oil, etc… All in a day’s work, right?

Editor’s note: This post is Part 7 of an ongoing series chronicling my efforts toward the restoration of my 1972 Datsun 240Z, originally my father’s. Read the other installments here:

5 Comments on Datsun 240Z Restoration:
Tactical Changes

Ugly Engines, Part II

January 17, 2012 by Matt

75 1975 Cadillac DeVille Engine V8

Any American V8 from the ’70s. These came from the “We’re being hit from all sides by regulations and don’t care what our engines look like” era. Truly awful, every American powerplant from this era is completely blacked-out, bathed in a sea of hoses and vacuum lines, and sports a hideous round air filter housing atop the engine. The ’75 Cadillac De Ville engine shown above looks downright pre-industrial.

Citroen Citreon CX Engine Motor

Most older Citroën engines. It wins points for actually looking like an engine and featuring some au naturel aluminum, but the placement of the spare tire and random plastic orbs scattered throughout the bay definitely detract from the engine’s appearance. I understand the cars’ packaging efficiency was a priority, and their unique hydraulic system was a selling point, but c’mon. Is the top of the engine bay really the best place for all of that?

Jaguar AJ V8 XK8 XJ8 Engine Motor

The Jaguar AJ V8. I include Jaguar’s first V8 engine not so much for its appearance, taken in isolation, but for the fact that it exemplifies the inevitable trend toward completely plasticized engine bays. The Coventry automaker’s sin of making their otherwise-excellent engine look like a kids’ toy is all the more grievous given the utter beauty of classic Jaguar engines, like their XK inline 6 from the early ’60s. Give me some aluminum to look at! Plastic, plastic, plastic…

Click here to read Part I of my series on ugly engines.

No Comments on Ugly Engines, Part II

Datsun 240Z Restoration: Little Things

January 16, 2012 by Matt

Datsun 240Z ID Plate VIN Block Number Matching

A few notes from the last month or so of having the Z home:

  • I bought How to Rebuild Your Nissan/Datsun OHC Engine last week as a sort of early birthday present for myself. Its purchase completes my acquisition of the “trilogy” of glossy Datsun Z-Car books. The other two books are How to Modify Your Nissan/Datsun OHC Engine (lots of naturally-aspirated race-prep stuff; very little on turbocharging) and How to Restore Your Datsun Z-Car (an absolute gold mine for the would-be restorer, with step-by-step instruction on teardown and reassembly, parts diagrams and loads of photographs). Gotta get a set of the factory shop manuals next.
  • The battery is removed from the car, but last night, in a kind of experiment, I hooked up my battery charger to the leads, turned the knob to “low charge” (5A or so) and turned the car on. Everything was as weak, as you’d expect from say, a dying battery, but it did something for me to be able to turn on the hazards, illuminate the lights and fiddle with the (original!) radio. Sometimes you just need to see a sign of life, you know? First time that’d been done in 8 years.

Datsun 240Z ID VIN Block Number Matching

  • I’ve been trying to determine whether or not the Z’s engine is original. Its status that way will have a big impact on how I go about restoring and/or upgrading the car. If it’s original, then I’d like to keep it original, which makes upgrading a bit more difficult (overboring the block from 2.4 to 2.8 liters isn’t quite as easy as I had thought it might be). If it’s a replacement engine, then all bets are off and, rather than rebuild it, I can swap it out for an engine that was 2.8l from the factory, the L28. So, how to establish the engine’s credentials? There’s an ID plaque (shown at top) affixed to the passenger side strut tower in the engine bay with the VIN and engine block number stamped on it. I hadn’t noticed it until now because when the Z was repainted in the late ’70s, the engine bay was blacked out and the ID plaque painted over. So, last night, I located the engine number on the block, shown above: 118555. I then removed the voltage regulator, allowing me to access and remove the ID plaque. I scraped as much paint off it as I was willing to last night (will eventually do the whole thing), but enough for me to read the block number listed: 110555. I’m almost positive it’s just a typo, but plan to ask those more familiar with these things for their take on the matter.

Editor’s note: This post is Part 6 of an ongoing series chronicling my efforts toward the restoration of my 1972 Datsun 240Z, originally my father’s. Read the other installments here:

Update (01/16 9:01 PM): Received some information about the VIN/ID plate numbers mismatch from a knowledgeable gentleman on one of the Z forums:

Looks to me like you have a mis-stamped service block.
The numbers don’t have the familiar “cursive” bent normally associated with Nissan OEM Stamps.

See the “L24?” The scripted numbers for the engine block should be similar, with the top section of the “8” looking somewhat like an onion with the green chopped off, if that makes any sense, along with the bottom section of the “5” being a bit more “open” and not a “reverse C” configuration.

I have never seen a mismatched plate/engine from Nissan, ever.

My surmise would be that you have a “service block” which arrived with no serial number in it, and generally the dealers left that blank when they installed it.

Looks like someone sometime got a letter-number stamp and just put the numbers on your block.

And they mucked it up.

Having a service Block in with no serial number arguably can be said to have a “Factory Service-Replacement Nissan Engine” and wouldn’t necessarily be knocked down for not having an “original” engine. (Some Z owners blew their ’70s engines at autox and got replacement engines from Nissan under warranty! What happened to those days GT-R tranny owners?)

Unfortunately, what you have is most definitely not “matching numbers,” but if you had service history to show the swap/change you could argue the accident like you theorize.

I’m querying my dad (the Z’s original owner) to hopefully get more of the story, if there is more to it. I just wanna know, you know?

8 Comments on Datsun 240Z Restoration: Little Things

Ugly Engines, Part I

December 30, 2011 by Matt

I’m beginning this new series fully aware that I’ll be tipping a few of my sacred cows and taking aim at some of my all-time favorite powerplants. Even so, there are situations in which the engineers, although aesthetics certainly aren’t their primary concern, deserve to be called to task for their creations’ complete lack of visual appeal. There’s a saying in aviation circles: “If it looks right, it’ll fly right,” and that maxim could apply broadly to automotive engineering as well in the sense that an attractive, well thought-out engine and bay is usually echoed by the quality of the engine itself. It’s not true in every case, of course—ugly engines can be world-beaters and a lovely pair of cam covers can surmount a turd of a powerplant—but in most cases good looks and good performance are complementary. In any event, let’s dive in.

Jaguar V12 E-Type XKE Series III 3

The early Jaguar V12. So…when the contraption under the hood doesn’t actually look like an engine, you know you’ve got a problem. It’s surely ironic that an automaker renown for creating some of the loveliest shapes on the road also developed this hideous monstrosity, littered with all manner of heat shielding, vacuum lines, linkages and balance tubes. Amazingly, the example shown above (from a Series III E-Type) is one of the more attractive iterations; the engine actually got uglier through the ’70s, utterly buried in a snake pit of first-generation fuel injection vacuum lines and emissions controls. When it ran, the Jaguar V12 was a very good engine, with smooth, lusty power available throughout the rev range, but the messiness of the powerplant’s home hinted at the tacked-on, poorly thought-out nature of its components, and served as a kind of warning for those foolish enough to buy a Jaguar so-equipped.

Volvo 760 PRV V6 Engine

The PRV V6. The designed-by-committee Peugeot-Renault-Volvo V6 engine is a classic violation of one of the cardinal rules of attractive engine building: Do not mount your peripherals on top of the engine. The air-conditioning compressor on the left side of the bay becomes the focal point instead of the engine itself, which for its part is shoved down and back in the chassis, any potentially attractive aluminum topped by a helping of dashpots and vacuum lines. The engine itself is kind of a nasty brute as well, and powered a number of rather infamous cars, such as the DeLorean DMC-12, Volvo 760 and Dodge Monaco.

Mazda 12A RX-7 RX7 Rotary Wankel Engine Motor FB

The Mazda 12A. I love this engine. Love it. It’s smooth, reliable, light, easy to rebuild, sounds wonderful with the right exhaust system and is blessed with a beautifully linear powerband. That said, I’ll never claim it’s a looker. It commits the same sin as the PRV above in mounting the alternator up high, and sports an ugly round air cleaner as well as a rats nest of vacuum lines. I desperately wish I owned a car motivated by a 12A, but so help me, it’s a visual mess.

Click here to continue with Part II of my series on ugly engines.

1 Comment on Ugly Engines, Part I

How to Define Handling:
Two Contrasting Approaches

December 28, 2011 by Matt

Wheel Suspension Forces Loads Drawing Schematic Diagram

I know that more than anything else, Motor Trend‘s post is kind of an end-of-year throwaway stat compilation. And the editorial staff certainly has enough sense to grasp that qualifying a car’s handling is more than about just the raw numbers. Still, the contrast in criteria between MT‘s “10 Best Handling Cars of 2011” and Car and Driver‘s recent duo of “Best Handling Car in America for Less than $100K” and then “…Less than $40K” is instructive.

In generating their respective assessments, MT relied solely on raw skidpad and track numbers, while C&D, although they used track time as a “tool” in their comparo, treated the numbers as a smaller part of a bigger picture, with additional metrics like steering response, body control and chassis composure factored into their evaluation. In contrast to MT‘s quick-and-dirty establishment of a benchmark for internet racers to bicker over, C&D set themselves the more ambitious goal of trying to qualify the un-quantifiable, of trying to methodically communicate something that’s primarily sensed by the driver, and oftentimes can have far more of an impact on how a car handles than raw capability. Case in point: Anyone who’s ever attended a track day or HPDE will tell you stories of many cars that were slower on paper actually driven faster around the track than more high-caliber racers, simply because the slower cars were more communicative and benign in their subjective feedback to the driver.

The finishing positions of the Corvette Z06 in both the MT and C&D articles provide an extreme example of the exclusivity of objective and subjective handling. According to the numbers, the car is supremely capable, ranking first in MT‘s assessment, but in terms of driver feedback and response, it leaves a lot to be desired, and it comes in sixth out of seventh in the C&D article.

The takeaway from all this is something forum junkies and car buffs in general need to bear in mind when flaunting track times, 1/4 mile trap speeds and braking numbers in online discussions: Your automotive hero may be the performance be-all end-all under the right circumstances, but figures alone don’t seal the deal. No one can prove one car is better than another by simply matching up the data—it’s how a car feels, how it responds, if it makes you smile and feel confident behind the wheel whether it has 90 or 573 hp. As far as I’m concerned, it’s the ability of the car to connect with its driver that separates the truly great from the pretenders, and ensures those that excel in that capacity a loyal following.

2 Comments on How to Define Handling:
Two Contrasting Approaches

Datsun 240Z Restoration: Coming Home

December 17, 2011 by Matt

Datsun 240Z Blue on Trailer

After many years of anticipation, HLS30-93069 finally made the 90-mile trek to its new home yesterday. As shown above, I loaded it onto a car carrier and borrowed my dad’s truck for the event. Naturally, it poured down rain the whole drive. Completely dry before and after, of course. I was more than a little frustrated with that turn of events given that it was moisture that caused the bulk of the 240Z’s current issues.

1972 72 Datsun 240Z Blue Garage

I waited until this morning to enlist my brother-in-law’s help in rolling it off the car carrier and into the garage. Fortunately, 2350 lbs or so isn’t a whole lot of car to push around, so I don’t foresee any issues rolling it in and out of its spot by myself when the need arises.

1972 72 Datsun 240Z Blue Garage

In the garage, still drying off. One of the prerequisites to actually digging into the restoration is building storage shelves and racks around the perimeter of the garage. We need space for the bits that get removed from the Z as well as general storage for the house itself.

1972 72 Datsun 240Z Garage Yellow Car Cover

After a gentle bath to remove whatever remained of 8 years of dust the rainstorm didn’t wash off last night, the Z was tucked in under an old car cover. Truth be told, it’s more there to protect my family from the car’s disintegrating rubber bumper strips than to shield the car from inadvertent kid scratches.

1972 72 Datsun 240Z Blue L24 L-24 Inline 6 Six Engine Motor

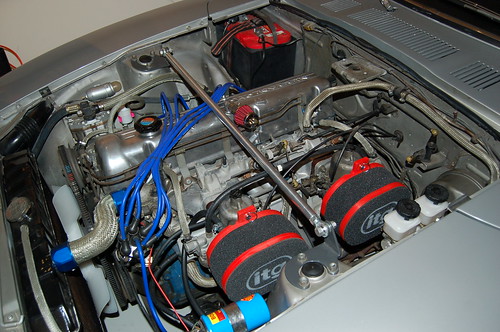
Cleaned up the engine bay a bit and reinstalled the factory orange air cleaner. Interesting Z tidbit: According to a reputable SU carb expert, the simple sheet metal air horns built into the inside of the air cleaner box flow somewhat better than any aftermarket units. Many early Z owners install non-factory air horns in pursuit of a looks and performance upgrade, but for the latter, there’s really nothing better than the orange OEM piece.

1972 72 Datsun 240Z Battery Tray Rust Rusted Out

A shot of the cause of many of the car’s issues: A rusted-out inner fender directly beneath the battery tray, up against the firewall. Driving the car in the rain, water has a direct path through the fender and firewall, down into the passenger floor pan.

I also completely removed any vestiges of the ill-advised electric fan conversion and its associated wiring, and drained the oil. The oil looked clean—there were no metallic flakes at all, but I doubt that’s conclusive as I’m sure I changed the oil immediately following the engine fire incident. I racked my brain trying to remember if there were any visible particulates in the oil then, but for the life of me I can’t recall. In any case, the engine’s coming out and going to be torn down and checked. At least it’s home. Feels good to have the Z where it belongs.

Editor’s note: This post is Part 5 of an ongoing series chronicling my efforts toward the restoration of my 1972 Datsun 240Z, originally my father’s. Read the other installments here:

7 Comments on Datsun 240Z Restoration: Coming Home

Technical Curiosities:
The Variable-Geometry Turbo

December 10, 2011 by Matt

VATN VGT VTG VNT Turbo Shelby Porsche Aerodyne Turbocharger Variable Geometry Area Nozzle Turbine

The variable-geometry turbocharger (VGT) has many names: Variable-area nozzle turbo (VATN), variable-nozzle turbine (VNT) or variable turbine geometry (VTG), to name a few. The name it’s given depends primarily on the company offering the technology—Holset, Aerodyne, Garrett or Porsche, respectively—but its principle of operation is the same.

Rather than employ a wastegate to vent excess exhaust pressure in order to regulate turbo output, and thus boost level, the VGT uses a ring of movable vanes which encircle the exhaust turbine. A computer- or analog-controlled servo alters the angle of the vanes in response to engine, turbo and driver demands, regulating boost level and turbo response far more quickly and seamlessly than an ordinary wastegate. Boost threshold, turbo lag and many other standard turbo disadvantages are greatly reduced or eliminated altogether, and the device enables the turbo to fulfill the promise of making a smaller, more efficient engine truly feel and act like a larger, more powerful one when called upon, without the low-end lethargy or surges that accompany conventionally-regulated turbo engines.

VATN VGT VTG Turbo Shelby Porsche Aerodyne Turbocharger Variable Geometry Area Nozzle Turbine Drawing Schematic Diagram

The VGT’s downsides include, as you might imagine, added complexity, and until recently a lack of durability from the delicate vanes at higher boost levels, when the temperature and pressure of the exhaust gas pouring into the turbine is quite intense indeed. Still, in spite of its complexity over a standard trap door wastegate, there’s still no more straightforward and adoptable alternative method of controlling boost; the VGT doesn’t require engine developers to redesign the entire powerplant to accommodate it—just a few piping changes, sensors and lines of code in the computer.

Among the first production cars to use a VGT was the limited-edition ’89 Shelby CSX-VNT, a breathed-upon Dodge Shadow whose standard 2.2l turbocharged Chrysler K-engine was mildly reworked and fitted with a Garrett VGT. 0-60 time was average for the day, in the mid 6-second range, but the engine’s full 205 ft-lbs of torque were on tap from an impossibly low 2100 rpm all the way through redline, thanks to the turbo’s unique method of regulating boost. Concerns over reliability meant only 500 CSX-VNTs rolled off the production line, and enthusiasts would have to wait another 18 years before another VGT-equipped, gasoline-engine car would appear in the States: The ’07 Porsche 997 Turbo, whose 3.6l, 473-hp flat-six was fitted with a pair of Borg-Warner VGTs. The advantages of the VGT—lack of a wastegate simplifying plumbing in the rear-engined car, and the chassis-settling boon of ultra-linear engine response—made the design a natural and long overdue fit for the 911. Of course, while we wait for more automakers to adopt the technology, aftermarket companies such as Aerocharger and Holset have been faithful to offer kits and turbo upgrades to tuner shops and ambitious DIYers.

Editor’s note: This post is part of an ongoing series spotlighting obscure automotive engineering solutions. Read the other installments here:

6 Comments on Technical Curiosities:
The Variable-Geometry Turbo